The interior of my car is a disaster. Apart from the worn carpet, missing headlining and faded/damaged leather, both driver and passenger seats in this car were badly damaged in their seat pads (i.e. the bit you sit on). The seat backrests were passable but faded and desperately in need of cleaning.
 |
| Seats as received- they are not actually attached and the drivers seat is in the passenger position (and vice versa) but the damage is obvious. They are also pretty grubby and I was told in no uncertain terms that no one I know is willing to sit in them until they have received some form of attention. |
The seats all consist of a metal frame made of tubular metal bar, to which is attached a rubber flexible panel (one for the seat base and one for the back); each held to the frame by spring links. The seat foam is stuck on top of this panel. The foam is composed of several sections; normally a raised edge is formed by frame section(s). These surround a recessed pad section which forms the major load bearing part of both seat pad and seat back. The foams are then covered with a fabric/leather cover which attaches to the circular sections at the edge of the frame using round spring clips. The cover has projecting wings on the back which penetrate down the gaps between the raised edge foams and the centre pad foams. These wings are then tied onto the flexible rubber base from below to hold the seat cover in place and provide the shape to the seat. The position of these tied wings is what generates the distinct moulded appearance to the seat.
 |
| Split in cover- foam damaged beneath |
 |
| Seat back is a frame covered in cardboard. Its attached with self tapping screws- two countersunk into cup washers at the base and two flat headed at the top. (perhaps these are not original). Probably not essential to remove the back in this case but the cover is just stapled to the cardboard frame and some have pulled out. |
 |
| Screw in cup washer |
 |
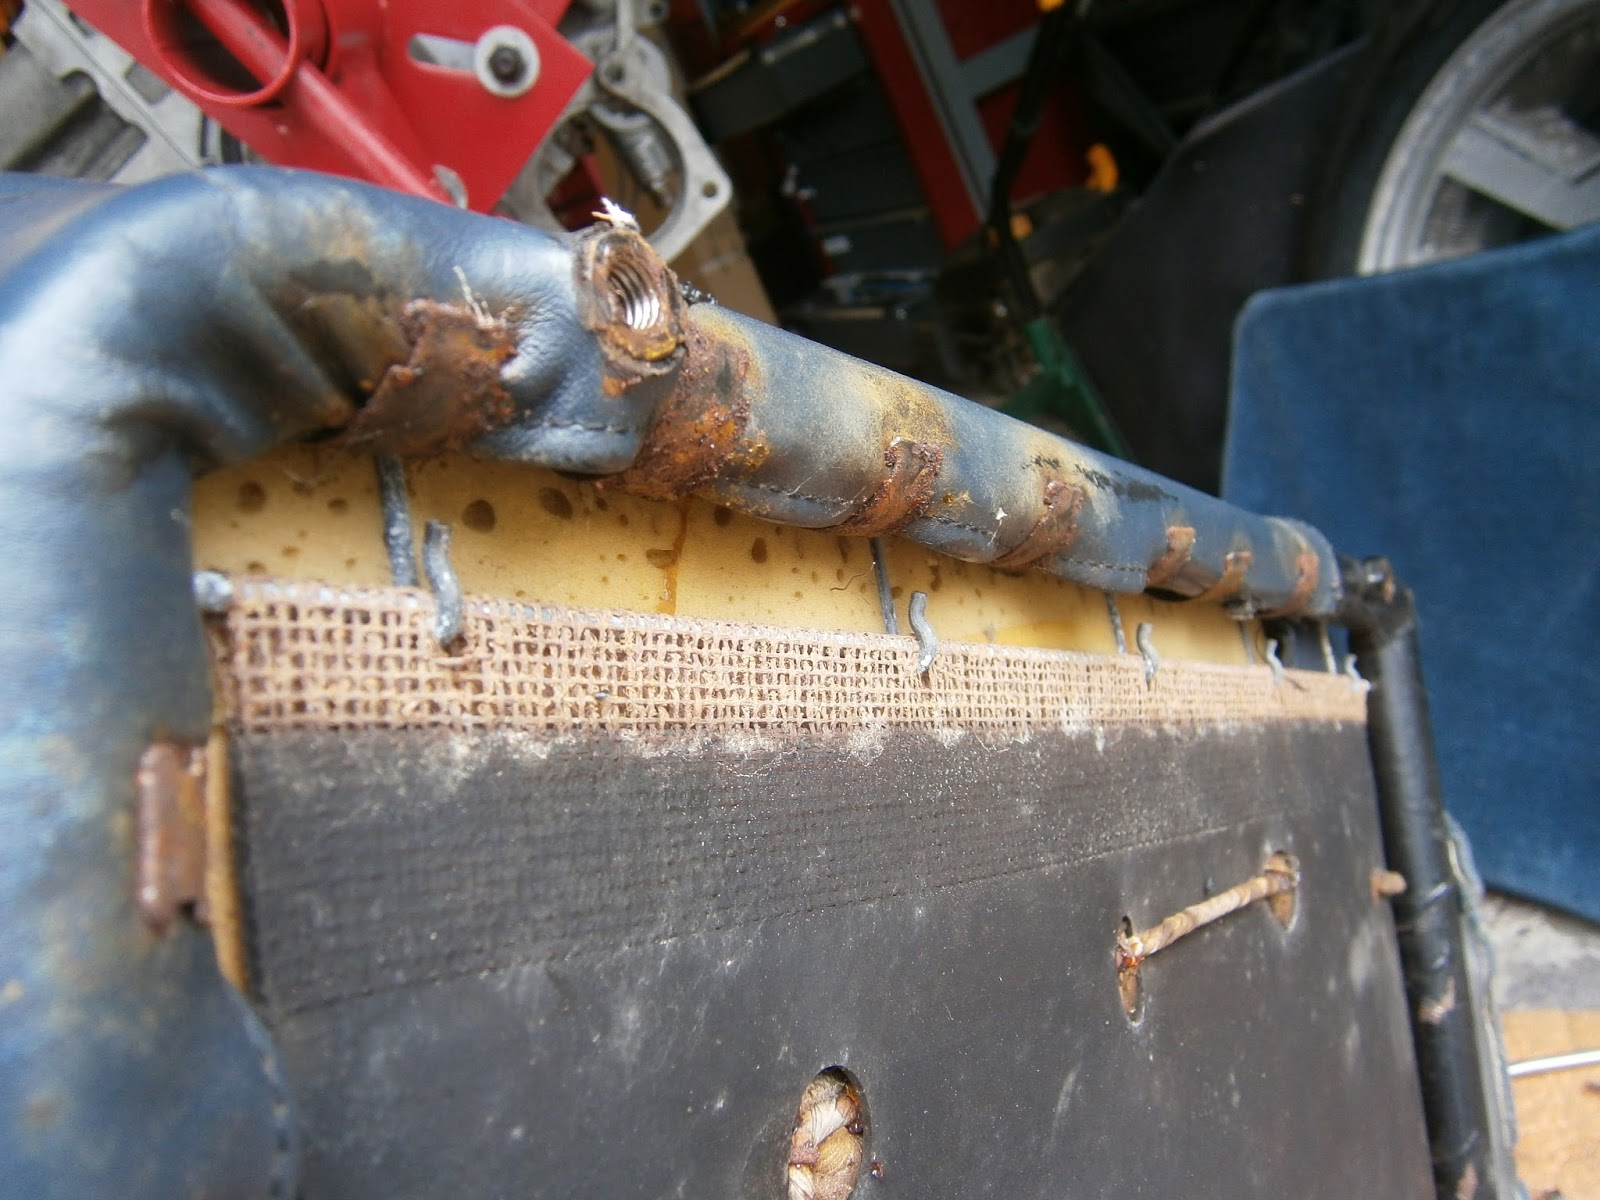
| Seat base from below. Large threaded section of flexator, seat cover retained by circular clips to seat frame sides and front. The flexator running around the flexible seat base is threaded in a zig zag fashion to engage with the flexator threaded through the bottom of the seat pad cover wings above via hog rings. |
Lotus call this threading strip Flexator. Its is a steel wire covered in a paper wrapping... its not fared well over time. The wire has rusted and gone brittle whilst the paper has deteriorated.
 |
| back-retaining screws as removed. I think these should match so I replaced them with black flanged trim screws. |
 |
| Seat back frame clips under the seat frame using three right-angle brackets- tricky to remove, one at each side and one (a longer one) at the top. Note staples have pulled out. |
 |
| Top seat back bracket |
 |
Seat back removed viewed from behind. The frame is cardboard and the velour/carpet covering is just stapled on.
Some of the staples were pulling out allowing the carpet cover to lift away from the cardboard frame but these were replaced using a staple gun.
|
|
 |
| Seat runner frame |
 |
| Need to slide runners back to reveal fixings (2 per side, Large Allen screws) |
 |
| Front Allen fastening |
 |
| Removed with key |
 |
| Seat frame removed |
 |
| Frame lifts off revealing base. Clips retaining cover, 6 at rear |
 |
| Leather tucked under at corners and at the pad back- carefully folded back out. |
Here a note from later... experience I wished I had had the first time around.
Firstly, during the long life of the seats, its doubtful that anyone has fed the leather under the seats. It will be hard, dry and brittle. Before doing anything feed the leather with some cleaner and let it soak in (overnight?) to restore some flexibility. This is especially true of the rear corners where the leather has been folded down by the seat hinge. It will split here unless fed.
Secondly, the hoop clips holding it to the tubular frame are vicious things. I think the covers are not meant to be refitted: the intended owners of a quality car should be able to afford a proper repair! Fast forward 40 years and that's not quite so true. Whilst Elans and Esprits have gone from strength to strength, Elites, Eclats and Excels have fallen into the hands of enthusiastic but impecunious amateurs such as myself... and "best bodge" is often the order of the day! Anyway, the clips have teeth that bite into the leather and if you pull them straight backwards they will tear it.
 |
| Teeth on seat frame clip |
It is vital that the teeth are pulled up and out of the leather before removing the clips so I later adopted a process of lifting the hoop by tapping a screwdriver underneath the ring in both directions along the tube and levering the teeth upwards to disengage from the leather. You can then try and tap the ring backwards releasing the leather.
 |
| Removing clips- at first I levered these off against the frame but this dragged them off across the leather and damaged the cover, later I realised that they need to be lifted off the leather before sliding them backwards. Note that they are fitted from the inside out wards and extend barely half way around the underside. This means that they are not really visible from the seat exterior. |
 |
| 7 clips on each side |
 |
| And on the other side |
 |
| 8 across the front |
 |
| Leather surrounds the runner attachment points |
 |
| one side clip remaining. |
 |
| removing corner clip and... |
 |
| ...releasing leather |
 |
| starting to fold the cover up- note its now detached at sides front and back but is still held by the threading of the wing sections onto the seat base. |
 |
| Here you see the seat wing section that penetrates down between the frame and centre panel foam sections. |
 |
| ...to be threaded in below as here. |
 |
| this shows the wing section of centre panel cover fed down by the centre panel. |
 |
| and retained by threading through hog rings. I tried long and hard to unthread; but in the end I just had to cut the threading to release the centre panel flaps |
 |
| seat base- damage to side. Raised frame at sides, note cut out round centre panel down which the seat base wings are routed to tie on underneath. |
 |
| Damage to foam |
 |
| Seat cover removed- note square central section surrounded by wings. This is topped with piping containing more rusty flexator. |
 |
| Flexator in piping gripped by hog ring which also still holds cut pieces of the threading flexator. |
 |
| flexator in piping- note how hog ring goes through below it and the threading section then holds it onto the flexible seat base. |
Well I did wonder if it would be possible to get new seat pads made up for this part of the seats. I do have the greatest respect for auto trimmers- and bodywork people as well for that matter- they don't just bolt things together, there is a finesse and an art to what they do. However it does have a cost... Unfortunately the only quote that anyone would send was at £200 PER SEAT BASE... not even the whole cover!!! This is an hourly rate around £500 which I feel is a little excessive and sadly that's not going to happen anytime soon. Although it will be worse, I will need to sort some sort of repair out myself. Obviously my aim here is not to repair the seats "as new". That will be beyond me, what I hope to achieve is to change this job from a problem that needs sorting NOW to one that maybe needs doing in another 12-24 months.
I have also heard from Woolies trim who don't sell anything like the rusty and knackered "Flexolator". I think I may be able to substitute curtain wire to get a tight fit. Its going to be dodgy but hopefully I can at least fix the holes and tears!
Foam
First thing is to fix the damaged foam. Luckily I have a fair bit left over from motorcycle seat repair. I use this composite dense foam which stands up well to use.
First thing is to cut a wedge-shaped slot to remove the damaged area. The best tool for this is an electric carving knife.
Cut a wedge from the high density foam to app the right size and shape and stick it into place using the spray Vitrex foam or carpet adhesive. This is used by spraying onto both surfaces to be joined and then waiting... its really essential to let the solvent evaporate and the glue to go tacky- a good 5-10 mins. Then press the foam into place. I had deliberately left this a bit too large so that I could carve it down with the electric carving knife and generate a good approximation to the cushion contour.
 |
| Inserted foam standing proud |
 |
| ...and trimmed to match seat profile. |
Covers
I tried several approaches before settling on the "best"... I will show what I did and what I learned.
Luckily I had been given sections from the back seat of a car with almost the same trim as mine- thank you forum! This was in pieces and it was fairly grubby but it wasn't worn, just a little faded and so a good match for mine. I washed these sections in
"Lux" soap powder and rinsed them thoroughly.
The first step of the repair was to cut out the damaged section in order to sew a patch underneath.
 |
| damaged section cut out |
My first intention was to fold the edges of the section under, pin them and then pin a section of replacement fabric underneath to sew through all layers at once and avoid a raw edge...
 |
| Edges folded under and pinned. |
Sadly this proved impossible... when the edges are doubled like this and a new piece below them the total is so thick that it can't be pinned let alone sewn. I was forced to give up on the under-lapped hem and sew through onto the patch. I could have tried wrong side sewing of the two pieces but didn't think of it- I just pinned the piece below and sewed through both from the top. The fabric is rubber coated underneath and hopefully this will prevent fraying... although it does make sewing harder.
 |
| Lining the patch up- check the "grain" of the material for even sheen- even though I took care to do this I still got it wrong! Make sure you check in sunlight and artificial light to be sure. My replacement fabric lacks the red piping stitch of my originals but at least the colour is a good match. |
 |
| Patch pinned below (no hem). Note enlarged holes in leather beneath |
 |
| And sewn into place- stitched through the leather at bottom. |
The repair was I think acceptable- well it only has to be acceptable to me. These covers needed replacing... and they still need replacing; but at least people might be willing to sit on the patched and cleaned version. I widened the holes in the leather and was able to sew through these to retain the lower edge of the patch onto the leather border. If doing this again I would think more carefully about the size of the patch- you can see adjacent edge damage here that I hadn't thought about and could have tackled as one. I could only get black carpet thread for this work- and it does show. Its not too bad because most of the top stitches are small and tend to pull down into the velour but blue would be better. I ordered some from Ebay.
There was also a small cigarette burn hole.
 |
| burn hole- trim edges |
 |
| Cut patch |
 |
| Stuffing the patch beneath |
 |
| Sewn in. |
This hole was a fairly small and self-contained piece of damage- it would have been easy to fix had it been in the centre of a piece of fabric. Sadly it was quite close to a seam which meant that I couldn't slide the patch under to surround it evenly but I did the best I could.
There were several places where the leather had pulled away from the fabric. The line of stitches acts as a perforation and the fabric simply tears along them leaving nothing to sew back on
I used carpet thread as whipping to sew through the existing holes in the leather, under the fabric and back up through it, thus pulling the edge down to the leather. This was effective but looked very ugly. Maybe better with blue thread?
 |
| Black thread used to whip in seat fabric |
Whipping with blue thread does look better. This is seat no two after the blue had been delivered. I think this learning on the job lark definitely means that the second seat will turn out better!
The leather fringe had taken a bit of a beating when the clips were removed. This has obviously weakened the fabric and made holes where I will need to replace the clips. I strengthened the leather by sticking a reinforcing strip of black leatherette (faux leather) on the back with the Vitrex carpet glue.
 |
| This is the corner of the leather- the part that gets trapped down by the hinge mechanism at the back. This area never gets fed and is very brittle- it will split unless you feed it first. Mine tore and needed to be strengthened with a back patch of the leatherette, the tear damage then needs to be filled with the vinyl repair kit. |
I couldn't get any of the Flexator any more so I bought some curtain wire. This was threaded through the front cross piece of the seat base edging
Curtain wire tends to form curves, so for tight 90 degree corners it has to be crimped with pliers...
... and then the sides can be threaded through as well
This reproduced the original shape quite well.
To help with pulling the cover over the seat I covered the sides in clingfilm to help the cover slide on. I would usually cover the whole seat foam but in this case I will need to feed the "wings" down the slit in the seat base.
The sides of the seat pad pocket (through which the curtain wire has been threaded) are pushed down as far as possible between the foam pads as the cover is slipped on.
The seat pad cover doesn't fit down properly until its tied down so it still looks a little loose- at least I hope that's the explanation.
Once the seat cover was in place it was secured with the frame clips. These need to be tapped on from behind the frame so that they can't be seen from the sides of the seat. It is a good idea to engage the teeth first and the push the clip round the back of the tubular frame thus tightening the fabric before tapping the clip home.
In extremis a clip that's already fitted can be twisted round towards the back to pull the fabric down and tighten it. Take your time and get it right first time as removing them will damage the leather yet again (I know).
Leather repair
Once the cover was on I could fix the numerous holes and tears in the leather. Most of these were so small that a backer wasn't needed, but for longer tears I used another piece of leatherette inserted through the damage and flattened out behind to support the area. I used a heat setting vinyl colour match kit for leather and vinyl seat repair, mixing blue and black to approximate the colour required.
I found this quite successful but my kit lacked a really good match for the grain and I used a pigskin style instead. Below is shown a patch of "pigskin " embossed vinyl repair filling a hole in the leather. I will eventually redye all the leather in the car (including any vinyl patches) so this will be less visible.

In order to link the wings to a curtain wire Flexolator replacement, I have two options. The first is to re-fit hog rings and for this I have ordered some 1cm rings and Sealey hog-ring pliers. I will try to insert the rings from below although it might have been better to fit them before fitting the cover... Oops! I didn't do this as I had thought it would be tricky to make sure I fitted the rings directly above the base holes. I later found that the rust tell-tales are actually quite reliable as a guide.
However, as the hog rings haven't arrived yet, I fitted the first seat cover using short lengths of twine tied around the wing curtain wire at each hogring rust mark and then pulled through from the back to tie onto the curtain wire beneath.
 |
| Strings tied onto wings and pulled through each hole in the base |
 |
| Threading curtain wire externally in and out of the base and tying each string loop onto the wire. |
 |
| I joined the end of the curtain wire together in this case using a ear-type pipe clip as my hogrings weren't here yet. |
I threaded the base wire in zig zag fashion through the base holes and tied the strings down to this. I could then tension the the base wire and crimp the ends together using a fuel pipe ear clip.
The next day my hog rings and pliers arrived so I set about testing these- It was indeed very awkward to pull the wing wire down towards the holes in the base but it could be done.
 |
| I used an offset screwdriver to hook the internal curtain wire and pull it back towards the base. |
 |
| Make sure you can see the curtain wire... |
 |
| ... and hook a hog ring under |
 |
| Like this. |
 |
| Thread the base curtain wire through the ring- tensioning as needed. |
 |
| Crimp the ring- You don't need these special pliers but they make it easier. |
 |
| Finished connection |
 |
| Completed loop tying down the wings inside the foam. |
Overall both methods worked well and gave a nice tight profile although the badly sewn patches I had sewn on did rather detract from the finish. Still its heaps better than it was before.... well in my eyes anyway!
 |
| Finished patched seat, not exactly invisible and I got the grain wrong- but there are no holes and the foam is solid. |
Seat controls
During the various handling steps it seemed to me that the seat controls were getting a bit scratched and these make the seats look tatty. I decided to repaint them. The centre cap of the recline wheel just levers out.
Revealing the fastening nut and shake-proof washer beneath. This wasn't very tight
 |
| Add caption |
It then lifts off- I have refitted the nut and washer to avoid losing them. The wheel was then resprayed as below.
The back tilt control just pulls off leaving a plastic sleve on the control rod. I re-varnished it.

I will store these until I refit the seats as they will simply get scratched again if I fit them while the seats are loose.
Refitting
Chronologically refitting had to wait a long time! Practically to the end really as lack of seats helped a lot with both fitting the new carpets and sorting the bent pedal box. However when I came to refit them I did it like this...
There are only 4 Allen cap screws to attach the runners to the seat frame and 4 bolts to hold the runner to the car. These penetrate the carpet and a stack of washers beneath which presumably level the seat for use. I maintained all these washers in their original places as I refitted the carpets so these should be fine for re-fitting the seats.
 |
| Spacer washers stacked over holes in floor shoulder section prior to sticking down carpet. |
The Allen caps should have washers, all mine were missing so I replaced these. Its a good idea to clean up and lubricate the runners before fitting them. I forgot this for the passenger seat but will remember for the drivers.
Fitting the seats is very awkward... the 4 bolt heads are semi-captive in the runners. They are prevented from turning when pulled into the base of the track, but they are free vertically so lowering the seat in order to insert the bolts simply pushes them up and out of the track where they are free to rotate and flap about jamming inside the frame instead of going through the carpets and spacer washer stacks beneath. Given the weight of the seat, lack of space and difficulty accessing these bolts this simple task becomes v tricky! The answer is to make sure firstly that the runners are retracted such that the bolt heads are immediately below the Allen heads. Secondly the small gap between the two bolt heads should be blocked with a metal spacer so that they are firmly pushed down in the tracks. I used suitably sized Allen keys or punches which could be withdrawn once the bolts were through the floor.
 |
| demo- floor bolt and Allen cap in position (off seat) |
 |
| How to jam floor bolt with Allen key- this prevents it floppy about or pushing back up inside the runner and makes fitting much easier! |
The Allen keys are onviously a bodge and if was doing this routinely I would make up an appropriately sized wedge. Alternatively a spot weld might help. I also replaced some of the washers beneath the car. when I refitted the nyloc nuts.
Final step was to replace the seat fittings. I may need to use the leather dye a little more on the seat side panel repairs.
For the time being, I'm rather pleased with the improvement